All the code for this chapter (and other chapters) is available at https://github.com/param108/kubernetes101 check the directory 017
Continuing with the theme of Scheduling in Kubernetes. Lets look a little more deeply at ways to influence the scheduling algorithm.
Whenever we create pods, we can specify the resources it will need. You also have flexibility to say whether this is a preference or a limit. Lets see how.
Resource Requests
Consider this to be the minimal requirements for your pod to be scheduled by Kubernetes. If Kubernetes does not see this requirement available on a node (due to pods already scheduled), it will choose not to schedule your pod there.
Resource requests are configured on a per-container basis.
Which resources ?
The 2 main resources that we are looking at are
- CPU – in cpu units 1 cpu unit is 1 vCPU/core. Fractional numbers are allowed
- RAM or memory – in bytes.
Other resources do exist, but we wont talk about them here. Further you can add custom resources as well.
Choosing Request Sizes
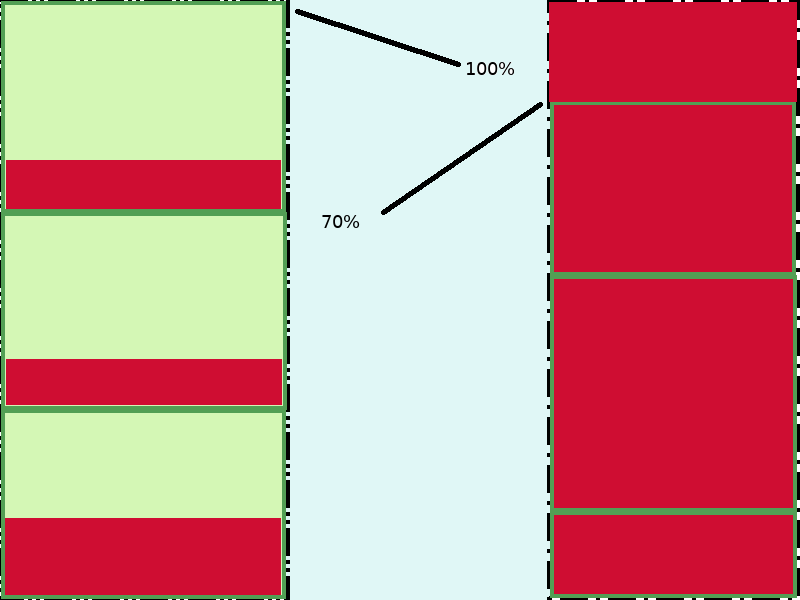
In the diagrams below the green boxes are the requests and the red shaded regions are the current usage at a particular point of time.
First (box on the left, below), lets choose the requests larger than the peak. The dark green lines are the requests. The dark red is the current utilization. In the diagram we have requested 100% but probably using less than 50%.

The problem here is the wastage. For nearly the whole day, the nodes are under utilized.
Second (above right), lets choose the requests equal to the average for the whole day. Here, the area surrounded by dark green border is only 70% of the total. At peak, though, the CPU level for each pod crosses the requested amount and you can see that the utilization on the node is 100%. This can lead to eviction of pods and maybe mis-behaviour of the node as it cant handle the extra load.
Resource requests are not hard limits, pods may take more resources than they request.
The Right Way
There is obviously no right way which works for all cases. This method is better than most though.
The first thing to do is average out your load across a number of pods. Lots of small pods should be the intent.
Next, your requests should be the peak of the new average value.
Finally, when the load drops, you can consider deleting a few pods and remember to scale up again when its time for load. Auto-scaling, which we will cover in a future post, will be key here.
No auto-scaling
Even in the case of no-auto-scaling, it is still better to have numerous smaller pods. This gives Kubernetes leeway to optimize usage better.
Effects of exceeding Resource Requests
- If a Container exceeds its memory request, it is likely that its Pod will be evicted whenever the node runs out of memory.
Resource Limits
Resource Limits are hard limits for resource usage. If a container exceeds its resource limit, it may be stopped and evicted. Specifically
- If a Container exceeds its memory limit, it might be terminated. If it is restartable, the kubelet will restart it, as with any other type of runtime failure.
- A Container might or might not be allowed to exceed its CPU limit for extended periods of time. However, it will not be killed for excessive CPU usage.
Setup
Setup the cluster like in previous posts with 4 nodes. The config kind.yml is in directory 017.
Configuration
You can configure Limits and Requests in your PodSpec or equivalent (eg. template in Replicaset). You configure it inside each container. The Limit/Request for a pod is the sum of limits and requests of the constituent containers.
You can configure the limits and requests in a container as below
spec:
  containers:
  - name: db
    image: postgres
    env:
    - name: postgres_password
      value: "password"
    resources:
      requests:
        memory: "32Mi"
        cpu: "125m"
      limits:
        memory: "64Mi"
        cpu: "250m"
Node resources
To see node resources you can use the command
$ kubectl  get nodes/realkind-worker -o json | jq ".status.allocatable"
{
  "cpu": "4",
  "ephemeral-storage": "229646500Ki",
  "hugepages-1Gi": "0",
  "hugepages-2Mi": "0",
  "memory": "16212588Ki",
  "pods": "110"
}
Please download jq, it is amazing help when working with json output!
This above command picks out the section section.allocatable from the json object returned by kubectl.
As you can see in kind, the memory allocatable is 16Gig, CPU is 4.
Scheduling 1 pod per node
Lets go back to our ubuntuPod from a previous chapter. You can find the code in 017/ubuntuPod.yml in the code repository and try and get Kubernetes to schedule only one pod per node relying only on resource requests.
apiVersion: "v1"
kind: Pod
metadata:
  name: ubuntu-pod
  labels:
    app: ubuntu-pod
    version: v5
    role: backend
spec:
  containers:
  - name: ubuntu-container
    image: ubuntu
    command: ["/bin/bash"]
    args: ["-c", "while [ \"a\" = \"a\" ]; do echo \"Hi\"; sleep 5; done" ]
    resources:
      requests:
        cpu: 3
As you can see above I have added a cpu resource request of 3 for the ubuntu pod. The files 017/ubuntuPod1.yml … 017/ubuntuPod3.yml have the same config with different names.
Apply
$ kubectl apply -f ubuntuPod.yml
pod/ubuntu-pod created

$ kubectl apply -f ubuntuPod1.yml
pod/ubuntu-pod-1 created

$ kubectl apply -f ubuntuPod2.yml
pod/ubuntu-pod-2 created

$ kubectl apply -f ubuntuPod3.yml
pod/ubuntu-pod-3 created

$ kubectl get pods
NAME           READY   STATUS              RESTARTS   AGE
ubuntu-pod     0/1     ContainerCreating   0          16s
ubuntu-pod-1   0/1     ContainerCreating   0          12s
ubuntu-pod-2   0/1     ContainerCreating   0          9s
ubuntu-pod-3   0/1     ContainerCreating   0          5s

$ kubectl get pods -owide
NAME           READY   STATUS              RESTARTS   AGE   IP       NODE               NOMINATED NODE   READINESS GATES
ubuntu-pod     0/1     ContainerCreating   0          22s   <none>   realkind-worker    <none>           <none>
ubuntu-pod-1   0/1     ContainerCreating   0          18s   <none>   realkind-worker4   <none>           <none>
ubuntu-pod-2   0/1     ContainerCreating   0          15s   <none>   realkind-worker2   <none>           <none>
ubuntu-pod-3   0/1     ContainerCreating   0          11s   <none>   realkind-worker3   <none>           <none>
So each Pod is on a separate node.
What happens if we try to create one more pod ?
$ kubectl apply -f ubuntuPod4.yml
pod/ubuntu-pod-4 created


$ kubectl get pods
NAME           READY   STATUS    RESTARTS   AGE
ubuntu-pod     1/1     Running   0          3m39s
ubuntu-pod-1   1/1     Running   0          3m35s
ubuntu-pod-2   1/1     Running   0          3m32s
ubuntu-pod-3   1/1     Running   0          3m28s
ubuntu-pod-4   0/1     Pending   0          12s
Unfortunately our pod is still pending, lets figure out why!
Events
One of the most useful commands for debugging for pod’s in pending state is
$ kubectl get events --field-selector involvedObject.kind=Pod,involvedObject.name=ubuntu-pod-4

LAST SEEN   TYPE      REASON             OBJECT             MESSAGE
0s          Warning   FailedScheduling   pod/ubuntu-pod-4   0/5 nodes are available: 1 node(s) had taints that the pod didn't tolerate, 4 Insufficient cpu.
This says the pod ubuntu-pod-4 could not schedule because one node “had a taint that it didnt tolerate”. This is probably the control-plane node. The second part says “4 Insufficient cpu” which means that 4 nodes didn’t have enough CPU.
Learnings
Setting Resource Requests and Limits correctly will allow your nodes to not fail under increased load.
Auto-scaling will allow you to scale up and scale down infrastructure to optimize costs.
kubectl get eventswill help you debug Scheduling failures.Numerous small size pods will give kubernetes the flexibility it needs.
None of this is Mandatory nor are brushing your teeth or maintaining hygiene.
Conclusion
This is the last post on Scheduling until a new feature comes around which gives us even more control.
Understanding how scheduling works and the variables Kubernetes uses to come up with a scheduling decision become more and more important as your infrastructure grows. As pressure on your cluster grows, an organized way of allocating resources will allow you to optimally use your cluster’s resources and also debug contention issues when they crop up.
In the next port we will look at how traffic can enter a kubernetes cluster.


