All the code for this chapter (and other chapters) is available at https://github.com/param108/kubernetes101 check the directory 013
Why Scale ?
Given a choice I would prefer not to scale. Scale tends to expose your flawed design, keeps you up at night with pagers and makes everything messy but it is what pays the bills.
Web Application
So you have a web application (with a database in the same server) that was working fine at about 10 requests per second and a thousand daily users. Suddenly the demand has gone up and your web server CPU crosses 90% during peak hours.
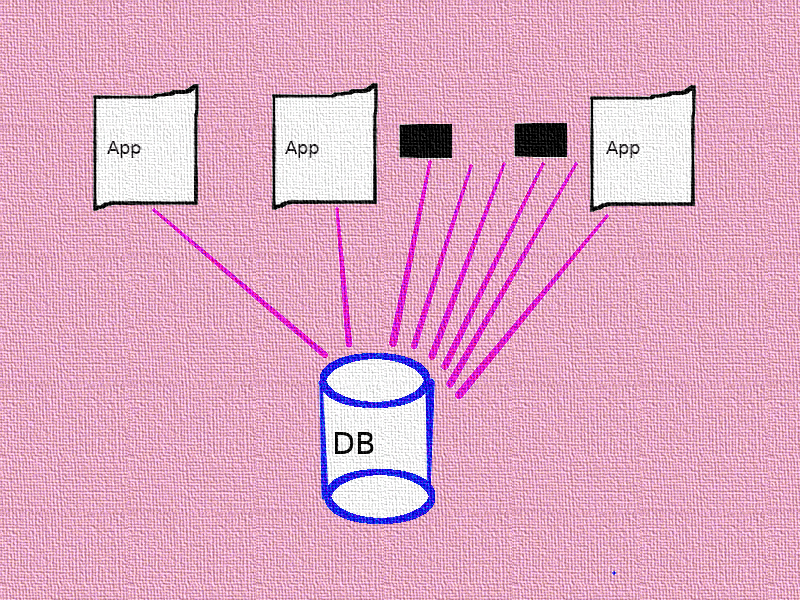
The Database, obviously, cannot be split as your object model requires everything to be in a single DB for cross-referencing.
Free the Database
The first obvious solution is to take the database into its own server. This reduces CPU on your Web server, allowing it to handle more requests.
The load goes up to 100 requests per second and 10000 daily users. The CPU on the web server is back up to 90%.
make sure you have monitoring for your servers early on and setup pagers. CPU, disk space and RPM so that you can react before things stop working.
Horizontally Scale the Web Application
It is assumed that your web-application does not store any state locally. For example, session data is stored in the database not locally on the file-system.
If the session data is stored locally on the web server, then the next time the user makes a request, it must land on the same web server. This makes it hard to horizontally scale.
If this assumption is true, then we can just add more web servers and place a load balancer in between to spread traffic across the web servers.
Further Scaling the Web Application
Finally, when the load grows even more, you can scale out the Load Balancers and resort to DNS load balancing. Similar to the diagram below
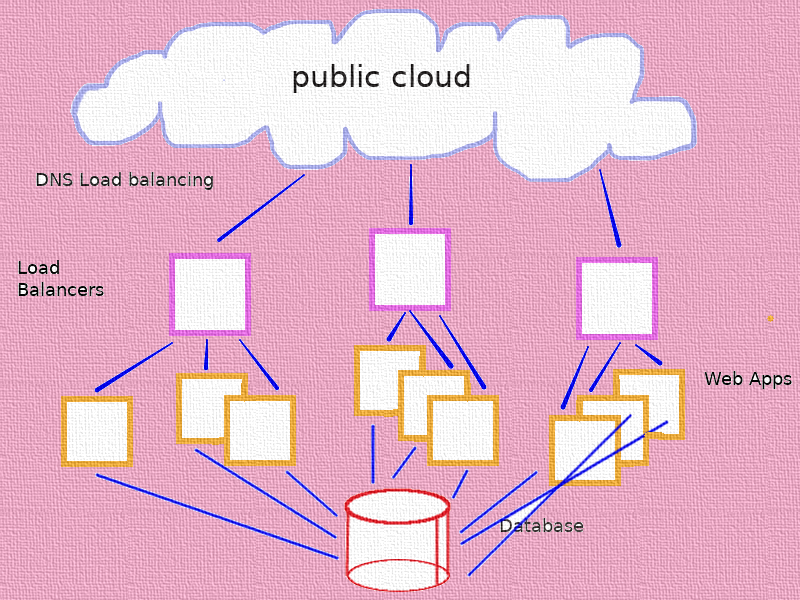
No prizes on what will become the bottle neck now :-).
Again remember, you can only do this because all the state sits in the Database. Application servers are stateless. Another important point to note here is that every request by the user potentially goes to a different App server.
Scaling in Kubernetes
Given the speed of containers startup time, it makes sense to handle scale by throwing more containers/pods at the problem.
Scaled Web App Version 1
Assuming we have a stateless web application as a docker how can we use a similar architecture as above in kubernetes ?
For version 1 we will use ReplicaSets and Services.
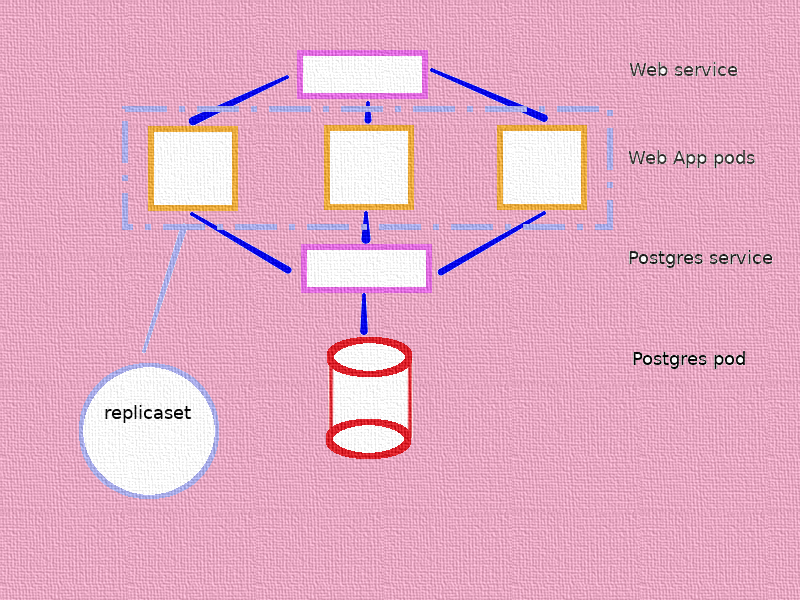
Services
A service is primarily a DNS endpoint. If you create a service called theservice you can send traffic to it from inside the cluster using the hostname theservice or more completely theservice.<namespace>.svc.cluster.local. The . at the end is not a typo.
Secondly, it will send traffic that it receives to pods it selects in a round robin fashion.
There is a lot of detail skipped here and services can be quite deep. We will go into much depth later. For now, consider it the load-balancer equivalent in kubernetes.
One important benefit about using a service is that you can use the dns name rather than finding the ip address of a pod. Without a service, you need the pod’s ip address to contact it.
We need 2 services for our setup
- Postgres service
- Web service
Postgres service
The only reason we create this service is so that we don’t need to find the IP address of the pod for the web servers to access it. Remember, pod IP’s may change in case of a recreation. Here is the service’s spec
apiVersion: v1
kind: Service
metadata:
  name: components
spec:
  clusterIP: None
  selector:
    type: db
  ports:
    - name: postgres
      protocol: TCP
      port: 5432
      targetPort: 5432
You can find this file in 013/service/components_service.yml
clusterIP: This is the IP that will be used by the kube-dns system to send traffic to. Here we have set it to None. This instructs kube-dns to create dns entries for pods which have spec.subdomain = components . components here is the metadata.name of the service. This type of service is called headless.
selector: This section is a list of labels and values that will be used to select pods to send traffic to. In this case, only pods with the label type = db will be considered.
ports: this is a list of ports that are open. The targetPort is the port on the pod that will recieve the traffic recieved by the service on the port. In this example, the service expects traffic on port 5432 and forwards it to the port 5432 on the pod. 5432 is the default postgres port.
Web service
apiVersion: v1
kind: Service
metadata:
  name: web
spec:
  selector:
    type: app
  ports:
    - name: http
      protocol: TCP
      port: 80
      targetPort: 8080
This code is available in the repository under 013/service/web_service.yml.
clusterIP: this is not specified in this spec. This tells kubedns it allocate a clusterIP. This also means the dns entry will be created for the service not the pods it serves.
selector: here the service will look for pods with the label type = app and will send traffic in a round robin way.
ports: Here the service will receive traffic on 80 and send it on to the pod’s port 8080.
Postgres Pod
Can be found at 013/service/postgres.yml
apiVersion: v1
kind: Pod
metadata:
  name: database
  labels:
    app: web
    type: db
spec:
  hostname: database
  subdomain: components
  containers:
  - name: db
    image: postgres:9.6
    ports:
      - containerPort: 5432
    env:
      - name: POSTGRES_DB
        value: web
      - name: POSTGRES_USER
        value: web
      - name: POSTGRES_PASSWORD
        value: web
metadata.labels.type: This is set to db so that the service can match it.
spec.hostname and spec.subdomain: The subdomain components is used to match the headless service. The resultant dns to be used from pods inside the cluster is database.components which is what is in db_host in the replicaset’s template for the web pod (below).
ReplicaSet
ReplicaSet is a resource that tries to keep a configured number of Replicas of a pod in play at all times. If the number drops below the configured number it uses the pod template in it’s configuration to create new pods. If the number is greater than the number configured, it will delete the extra pods, even if it didn’t create them!
This is our ReplicaSet spec.
apiVersion: apps/v1
kind: ReplicaSet
metadata:
  name: backend
  labels:
    app: web
    type: replicaset
spec:
  replicas: 3
  selector:
    matchLabels:
      app: web
      type: app
  template:
    metadata:
      name: web
      labels:
        app: web
        type: app
    spec:
      containers:
      - name: web
        image: web:latest
        imagePullPolicy: Never
        command: ["/web"]
        args: []
        ports:
          - containerPort: 8080
        env:
          - name: db_name
            value: web
          - name: db_user
            value: web
          - name: db_pass
            value: web
          - name: db_host
            value: database.components
Note the db_host value and the label type=app.
replicas: 3
Web application
To get these examples to work on ubuntu 18.04 you will need to delete your minikube and start it again in the following way. Otherwise the dns doesn’t work very well.
/usr/bin/minikube start --vm-driver=virtualbox --extra-config=kubelet.resolv-conf=/run/systemd/resolve/resolv.confThe web application is exactly the same as in part 12. Set it up as follows.
$ eval $(minikube -p minikube docker-env)
$ cd path/to/checked/out/repository
$ cd 013/service
$ make docker
Setup
Create the postgres pod and then the service to talk to it.
$ cd 013/service

$ kubectl apply -f postgres.yml
pod/database created

$ kubectl apply -f components_service.yml
service/components created

$ kubectl get pods
NAME                     READY   STATUS    RESTARTS   AGE
database                 1/1     Running   0          24s

$ kubectl get services
NAME         TYPE        CLUSTER-IP   EXTERNAL-IP   PORT(S)    AGE
components   ClusterIP   None         <none>        5432/TCP   15s
kubernetes   ClusterIP   10.96.0.1    <none>        443/TCP    3h35m
Now create the Replicaset and the web service
$ kubectl apply -f webreplicas.yml
replicaset.apps/backend created

$ kubectl apply -f web_service.yml
service/web created

$ kubectl get services
NAME         TYPE        CLUSTER-IP      EXTERNAL-IP   PORT(S)    AGE
components   ClusterIP   None            <none>        5432/TCP   3m6s
kubernetes   ClusterIP   10.96.0.1       <none>        443/TCP    3h38m
web          ClusterIP   10.100.108.86   <none>        80/TCP     8s

$ kubectl get pods
NAME                     READY   STATUS    RESTARTS   AGE
backend-5vkvp            1/1     Running   0          23s
backend-882r4            1/1     Running   0          23s
backend-qbs26            1/1     Running   0          23s
database                 1/1     Running   0          3m31s

$ kubectl get replicasets
NAME               DESIRED   CURRENT   READY   AGE
backend            3         3         3       29s
Testing
A useful image to use when testing your kubernetes setup is dnsutils this is available on public docker. This is a docker image with all tools required for debugging dns issues, like dig, nslookup etc… To create a pod with this, just use this podspec
apiVersion: v1
kind: Pod
metadata:
  name: dnsutils
  namespace: default
spec:
  containers:
  - name: dnsutils
    image: gcr.io/kubernetes-e2e-test-images/dnsutils:1.3
    command:
      - sleep
      - "3600"
    imagePullPolicy: IfNotPresent
  restartPolicy: Always
013/service/dnsutils.yml has this spec. Lets create a job with this image and use it to test our service.
Its good to create your own image with all the necessary tools which you can spin up at a moments notice in a cluster to debug connectivity and name resolution errors.
$ kubectl apply -f dnsutils.yml
pod/dnsutils created

# lets check if database.components has an ip address
$ $ kubectl exec -ti dnsutils -- nslookup database.components
Server:         10.96.0.10
Address:        10.96.0.10#53

Name:   database.components.default.svc.cluster.local
Address: 172.17.0.4

# lets check if the web service has an ip address
$ kubectl exec -ti dnsutils -- nslookup web
Server:         10.96.0.10
Address:        10.96.0.10#53

Name:   web.default.svc.cluster.local
Address: 10.100.108.86
Another image I like to use to test things like curl etc is dobby thecasualcoder/dobby. Lets use it to test the web service functionality. You can use any image with curl.
root@dobby-657587fd57-gnm67:/# apt update && apt install -y curl
...
...

root@dobby-657587fd57-gnm67:/# curl web/ping
<html>ok</html>

root@dobby-657587fd57-gnm67:/# curl web/write -d '{"data": "first line"}'
{"success": "true"}

root@dobby-657587fd57-gnm67:/# curl web/read
{"success":"true","Lines":[{"id":1,"data":"first line"}]}
Now lets test the round robin. If you remember /quit kills the server. If we call /quit 3 times we should see the restarts incrementing on each pod of the web service.
$ kubectl get pods
NAME                     READY   STATUS    RESTARTS   AGE
backend-5vkvp            1/1     Running   0          30m
backend-882r4            1/1     Running   0          30m
backend-qbs26            1/1     Running   1          30m
database                 1/1     Running   0          33m
dnsutils                 1/1     Running   0          14m
dobby-657587fd57-gnm67   1/1     Running   0          9m31s
$ kubectl get pods
NAME                     READY   STATUS    RESTARTS   AGE
backend-5vkvp            1/1     Running   0          30m
backend-882r4            1/1     Running   1          30m
backend-qbs26            1/1     Running   1          30m
database                 1/1     Running   0          33m
dnsutils                 1/1     Running   0          14m
dobby-657587fd57-gnm67   1/1     Running   0          9m31s
$ kubectl get pods
NAME                     READY   STATUS    RESTARTS   AGE
backend-5vkvp            1/1     Running   1          30m
backend-882r4            1/1     Running   1          30m
backend-qbs26            1/1     Running   1          30m
database                 1/1     Running   0          33m
dnsutils                 1/1     Running   0          14m
dobby-657587fd57-gnm67   1/1     Running   0          9m31s
As you can see the RESTARTS incremented with each call to /quit. It is not guaranteed that it will be exactly in this order, but we got lucky. So we prove that requests are going to each service.
Learnings
services allow us to use dns names rather than pod IPs.
services send traffic down stream to pods on specified ports. If many pods are configured, traffic is sent in a round robin way.
ReplicaSet is used to create and maintain duplicates of a pod.
Horizontal scale is only possible if the Web Application doesn’t store any state locally.
Its a good idea to have a
utilspod with all necessary tools installed to quickly debug connectivity issues.Headless services allow you to create DNS entries for many pods directly using
spec.subdomain.
Conclusion
Now we have setup a scaled web application in kubernetes. There are a number of issues with this setup, which we can do better at. We will look at those in the next post.
