The smallest unit of work that kubernetes can schedule is a Pod.

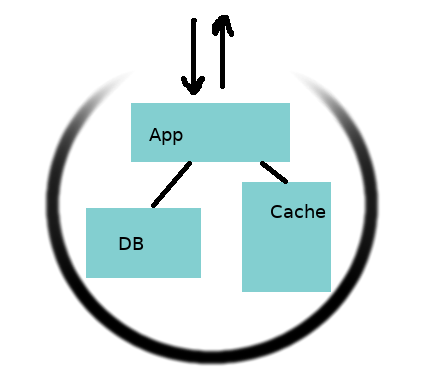
A pod is a group of one or more containers scheduled together. Above is a pod with 3 containers the app server, a DB and a cache. The App has exposed a port to the outside world and so the circle is dimmed over there. Putting your App, DB and Cache in the same pod is actually a very bad idea but as we are experimenting, lets be naive.
Lets start by creating a pod with a simple ubuntu server, doing nothing.
Creating a Pod
There are many ways to create pods. We cant list all of them here, but want to describe the simplest ways first. Make sure your minikube is running with
$ minikube status
host: Running
kubelet: Running
apiserver: Running
kubeconfig: Configured
kubectl run
kubectl run job1 --image=nginxIn the above command we are telling k8s to run a pod called job1 and use the docker image nginx. If it doesnt find the docker image locally, it will try to pull it from the public dockerhub. Lets see if it really did something.
$ kubectl get pods
NAME                    READY   STATUS    RESTARTS   AGE
job1-847956d49f-f6pfm   1/1     Running   0          36s
so it created a job1-<random string>-<random string> cool. You can find the details of the pod using kubectl get pods job1-847956d49f-f6pfm -oyaml
The output will be quite big but this is the important piece for us
spec:
  containers:
  - image: nginx
    imagePullPolicy: Always
    name: job1
    resources: {}
    terminationMessagePath: /dev/termination-log
    terminationMessagePolicy: File
many of these values can be sent to run on the command line dokubectl run --help to explore further.
Deleting a pod
Moving on, lets delete the pod
kubectl delete pod job1-847956d49f-f6pfmLets check if it got deleted…
$ kubectl delete pod job1-847956d49f-f6pfm
pod "job1-847956d49f-f6pfm" deleted
$ kubectl get pods
NAME                    READY   STATUS    RESTARTS   AGE
job1-847956d49f-p9m8j   1/1     Running   0          6s
Thats weird the pod has been deleted but a new one has been created. Whats going on ?
Well, kubectl run by default creates a deployment. The deployment created a replicaset which created the pod. We will learn more about deployments etc. If you want to see what all got created by a command you could try --dry-run -oyaml this will tell you what will be created without actually creating it.
Dry Run
$ kubectl run job1 --image=nginx --dry-run -o yaml
apiVersion: apps/v1
kind: Deployment
metadata:
  creationTimestamp: null
  labels:
    run: job1
  name: job1
spec:
  replicas: 1
  selector:
    matchLabels:
      run: job1
  strategy: {}
  template:
    metadata:
      creationTimestamp: null
      labels:
        run: job1
    spec:
      containers:
      - image: nginx
        name: job1
        resources: {}
status: {}
In our case as we started with an empty minikube we can see all objects using the command kubectl get all
$ kubectl get all
NAME                        READY   STATUS    RESTARTS   AGE
pod/job1-847956d49f-p9m8j   1/1     Running   0          5m16s

NAME                 TYPE        CLUSTER-IP   EXTERNAL-IP   PORT(S)   AGE
service/kubernetes   ClusterIP   10.96.0.1    <none>        443/TCP   47h

NAME                   READY   UP-TO-DATE   AVAILABLE   AGE
deployment.apps/job1   1/1     1            1           12m

NAME                              DESIRED   CURRENT   READY   AGE
replicaset.apps/job1-847956d49f   1         1         1       12m
Ignore the service/kubernetes. Everything else was created by our command. In short a deployment is a resource that makes sure a specific number of pods are available. It does this by creating a replicaset which actually monitors. If you delete the deployment using
kubectl delete deployment deployment.apps/job1You should see that it deletes the pod and the replicaset and the pod.
To create *only* a pod using run you would
kubectl run --generator=run-pod/v1 job1 --image=nginxIf you delete this pod a new one will not be created and the name of the pod will be just job1.
Mini-Cheat Sheet.
By now you should have realized that to get existing
podsyou will do
kubectl get podsInfact to see any resource you do
kubectl get <resource type>
to see a specific resource
kubectl get <resource type> <resource name>
kubectl get pods job1
To see all resources just do
kubectl get all
Similarly to delete any resources do
kubectl delete <resource name>
to get help on any command just suffix –help
kube get pods –help
to just see what will be created without actually creating anything suffix with
--dry-run -oyamlkubectl run job1 –image=nginx –dry-run -o yaml
Finally to get verbose output use
-ofollowed by the format you want the output inyamlandjsonare both supportedkubectl get pods job1 -o yaml
Conclusion
In the next post we will go over more ways to create simple pods. Pay attention to the patterns mentioned in the Mini-Cheat sheet. You can apply those patterns on almost all commands and will let you get more information on the resources being created.


